Mobaco 100 Years
This year Mobaco celibrates its 100 years of existing, turning a vintage toy into an antique toy...
So it was time for creating nice presents for both Nick & Caspar during this special 100 years Mobaco. Not only for their part of researching Mobaco, but also organising some Mobaco exhibitions, still sharing new Mobaco findings with the group/world, updating the fantastic website mobaco.nl and keeping the Dutch Mobaco group together with their professionalism & enthusiasm!
So what could be a nice topic for a small present? A special Mobaco set? Something elegant/different material usage/special building? Something combining Mobaco & re-assembles 'spreading the word'?
Message in a bottle...
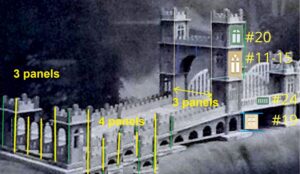
Since Caspar and myself reconstructed Model Z, that model would be a nice subject for adding inside a bottle. And for Nick, the chosen model is also straight forward: Since he played as child with the Jumbo version, why not build that small town on the front cover of the boxes, including that never released windmill?!
Watching movies about placing ships inside bottles, that's almost getting close to art, that might be a bridge to far. Also watching a couple of movies about popup books, when opening a page, a 3d construction folds out... Very cool and I could image to use the backside for some text..
Since we did already build some 1/3th scaled Mobaco buildings, creating such a scaled building is still the nicest way going forwards...
Prototyping...

Prototype 1 was a simplified 25% Mobaco model. Both for rolling up and potential pop-up folding patterns, while moving this model inside the opening of a bottle. Either the model is getting way too simplified or the folding strategy will be way too complex.. This is a no-go.
Prototype 2 was also a simplified 25% trial. A complete Mobaco wall (or multiple walls) could be printed on one piece of paper. Then adding some wooden sticks on the outside for the looks and feel.. This might be a technic creating small buildings rapidly. The overhangs (especially for Model Z), makes it a bit more complex bit still do-able. And it’s a quick way for checking some of the dimensions. But maybe it’s still too simplified, let's think about it and jump already to the next subject..
Bottling time…
The 25% scale seems to be a feasible size. It’s time finding a fitting bottle. Not too big, not too small.. A square whiskey like bottle seems to fit best, having the a relative big model and relative less glass. So that’s the one I want: glass bottle ‘Noel’ (700 ml). Most bottles having a small opening, around 20 to 25mm, so need a different way of adding a building inside…
So, just remove the back side! Started with a Proxxon grinding disc, but after two ~20mm discs, not even one side was cutted.. So needed more power and took an angle grinder from the workshop and removed the backside. (It only created one big crack, but the remaining bottle still survived.) Also created an another quick 3D prototype, from material I haven’t tried before. Time for a new fitting test…

The laser cutter liked this laserboard (0.9mm) very much, it’s strong material, small details looking great and these details are still quite solid. But overall, it still misses the typical wooden columns and the Mobaco colors. So this material is a no-go.
For the fitting purpose, I knew already the roof need to be inserted separately, but a bigger problem was the balcony on the side! I was focusing on the base plate (which fits), but totally forgot about that balcony, grrr..
Refocus: It will be a 1/5th model…
After this small setback, it was finally time for the real deal. A 20% scaled model ‘should’ fit, shouldn’t it? So let’s build that, before I’m running out of patience..


Using the same type of material like before. And making things easier: both floors are created out one piece, which is also a bit stronger. (No one knows right?!)
Since the laser is following an infinitive thin contour (lines from the DXF file), the actual laser dot is bigger, about 0.1-0.15mm. When creating these very small windows & fences, this laser dot will have a relative big effect on the outcome. So all wall panels in CAD needed some laser burning offsets, which is relatieve easy to do.
So creating these ~120 parts was actually the most easy part of the whole process. (And I’m still happy creating more tiny walls & base plates, if you need some too.)
Wooden columns…
In the mean time, some 3x3mm wooden sticks from China arrived, but since the scale changed, now 2.4×2.4mm columns were necessary.. It was still possible to saw these tiny columns with a normal table saw. Started with real Mobaco wooden column, but somehow that did not work out. The columns were bended a lot, so used some plywood instead.
So up to the next challenge: how to create 0.8mm width grooves? Back to the Proxxon with the last grinding disc, hopefully it will hold. So created a small jig, 3D printed some brackets for the Proxxon, so it could be used as mini saw table.


The Proxxon bearings were already halfway broken, which makes a lot of noise and while mounted in this setup, the Proxxon needed two passes for every groove getting the right depth. But the fun thing about building small prototypes: it also need less material! This model only needs about ~80 cm columns in total. After the columns were created, the same setup was used for cutting the columns to the right length.
Finaly building time…
First a quick check, if the wall panels fit the grooves and the building phase could finally begin. Using a bit of wood-glue and two tweezers, mounting everything together.


Great, this looks nice already!
And on top of that, it’s also fitting inside the bottle!
The real challenge was creating those stairs… Those steps are so small, it’s almost impossible to glue this together. So with a 2nd attempt, created a new staircase with longer steps, which are more easy to stick together and glue. When dried, the extended sides of the steps were removed.
The next challenge…
The model needs to stick inside the bottle and it would be very nice, if it’s possible to close the bottle too…
Played before with some (food approved) UV resin. So contacted the supplier if it would attach to glass and there advice was to buy a very expansive resin type, specially suitable for adhering to glass… So okay, let’s use the food approved version instead.
Placing the bottle horizontal, inserted the model and used some tape, covering the lower side of the bottle. Mixed the resin with some green color dice and poured just enough into the bottle. After a day it was cured. And the resin is actually adhering to glass very well!

Drinking a cup of coffee, celebrating this next small but necessary success, it was time to create the bottom. Basically the same technic, but somehow something went wrong. Maybe wrong mix or too much leaking, maybe contact with that temporary plastic foil(?), anyway, the bottom side did not cure! Time for plan B.
Silicon molding…
Okay, let’s go for an other experiment. Instead of a flat (not working) bottom, creating a silicone mold with some text is way nicer! So back to the drawing board, designing & 3D printing a positive mold (PLA), which then needs to be encapsulated by a negative silicon mold, which should end up in a wonder. And yes it did!

The positive mold came out nice. But the silicon mold did not! It was actually a stupid mistake orientating the positive mold up-side-down (like my CAD picture).
Plan C: so let’s create a 2nd mold, dry for another day and this time, having the positive mold facing up like picture above. Now (potential) air bubbles will not effecting the textured side of the mold.


Ah, that went perfect, that’s how we like it. Even the 3D printing artefacts are still visible inside the silicon mold. Next time, it would be better creating a bit higher mold, although this will work out. It’s time for the 2nd attempt closing the bottle:

Label & cap…
While the bottom side of the bottle is still curing, it’s time for designing & trying a label. The final label is printed on ‘clear shipping label sheet’ (from Avery Zweckform L7567-25) and cut. After peeling off the backside, it nicely adheres to the glass bottle.
Also the corq needs some marking and now the bottle is considered done. Since that little Model-Z was so cute, I wanted a 2nd one and also needed to continue with Nick’s version…
In the meantime, the curing did adhere very well.
So bottle 1: considered done.
The result
With bit of patience & some perseverance, I’m quite pleased with the end results: two bottled miniature versions and extra mini Model-Z. I would love to create many more, maybe I will do so someday…


Some more random pictures