Installation LeoCAD Library
Building with the released vintage toys could be done with LeoCAD.
(LeoCAD works on Windows, Linux & macOS.)
For using the vintage toys library, the 'standard' LeoCAD library basically needs to be replaced with this vintage toys library. That's what this article is about.
1. Download LeoCAD
LeoCAD installation should be downloaded here: LeoCAD.org/downloads
Choose your operating system.
("LeoCAD-Windows-23.03.exe" is used on this page).
Run the installation program, incl. 'Parts Library' if you like so.
(Default installation path: "C:\Program Files\LeoCAD".)
And open the application:

For a better understanding of building with LeoCAD, just read this short online tutorials: https://www.leocad.org/docs/tutorial1.html.
And/or watch some youtube movies:
Installation:
- dec 2020: How to install LeoCAD on Linux
- aug 2021: Getting Started with LeoCAD: Just Do Step 2 (installation for Mac)
How to use:
- jun 2020: LeoCAD - How To Use All Its Features
- jun 2020: LeoCAD - Animation Part 1, Making Great Stop Motion Animations & Part 2. [GER]
- jul 2020: Bauplanerstellung - Tutorial 1 - LeoCAD [GER] (incl. submodels & steps)
- nov 2023: Professionelles CAD-Programm für Lego vorgestellt [GER] (incl. submodels)
- sep 2025: LeoCAD LEGO software for Windows, Mac, and Linux (building tutorial)
- may 2025: Short tutorials: introduction, submodels.
2. Install the downloaded library
Different libraries could be downloaded from: Cults3D.
(Just create an account and download your favorite toy.)
The downloaded file from cults is a zip-file called: cults3d.zip.
→ Unpack this zip-file.
Now you will have 2 zip-files:
- mobaco_library_v1.5_EXPyyyymmdd.zip
- mobaco_models_v1.5.zip
For the ease of use, LeoCAD comes with it's own "library.bin" file, containing many Lego like parts.
We need to select a different library. This could be done inside LeoCAD.
→ Follow the next steps:
- Open LeoCAD.
- Open 'Preferences...' window.
(Select menubar: View - Preferences... ) - Click the ZIP-icon & select: 'mobaco_library_v1.5_EXPyyyymmdd.zip'.
- Press 'Ok' and re-start LeoCAD.

The next time LeoCAD starts, the parts of the new library are loaded:

→ Just check if everything went okay:
- Open LeoCAD application again.
- In the 'Parts' categories, click on 'All Parts'.
- Now the 'part list' should contain the new toy parts.
3. Categories & example buildings
In the parts menu (previous picture), some different catgories (Animal, Antenna, Arch,..) are shown. These are categories for finding Lego like bricks.
Since we don't have these bricks, the categrory list should be updated.
For this, we need the 'mobaco_models_v1.5.zip' file.
→ Unpack the 'mobaco_models_v1.5.zip' file.
You will see at least 2 file tyes:
- category.txt
- buildings.mpd
First adjust the categories
→ Open LeoCAD application again and follow these steps:
- Open 'View-Preferences' menu
- Select 'Categories' tab
- Press the button 'Import...'
- Select our new 'category.txt' file.
- Press 'Open'.
Test existing buildings
→ Open LeoCAD application again and follow these steps:
- Click 'File-Open'
- Select a 'buildings.mpd' file
- Press 'Open'.
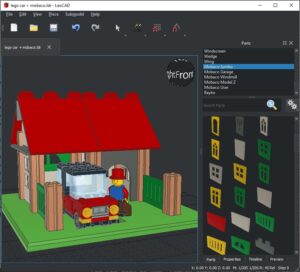
One ore more pre-created buildings should be visible on the screen.
Tips & Tricks
Update LeoCAD preferences
Optional there are some small tweaks to be done, creating a more pleasant way to build.
I like to use the cross-lines of the grid, as center for adding pillars.
For changing these kind of options, follow the next steps:
- Open the 'Preferences' screen again.
- Select the tab 'Views'
- Draw studs: NO
- Draw lines every 6 studs. (At least handy for Mobaco library)
- Press 'Ok'.
Tips & tricks building
There are many ways to build with LeoCAD.
Some tips & tricks I'm using:
- Always use the snapping tool:
- Snap XY: 3 studs (shortcut '7' on keyboard)
- Snap Z: 1/20 stud
- For roofs only: Snap XY: 1/20 stud (shortcut '1')
- Every floor, I'm building on the grid (Z=0).
When done, the floor will be lifted to the right location. - When building, always use Orthographic view projection.
For instance when the floor is ready, click on 'Front' view, and drag the floor to the right location. - For selecting parts, make use of both the Ctrl & Shift keys for easy/quick select/de-select (multiple) parts.
These are very powerfull selecting methods! - Use Ctrl-D for duplication of (multipe parts) and then drag the new selection to new position, when ever you can.
When you get the 'hang' of it, this will speed up buillding a lot!
(Somehow LeoCAD is not saving these settings, so you have to apply them everytime you start the application.)
Ready to build
Now, your favorite LeoCAD part library is installed and the categories are updated, it's time to build!
See more custom Mobaco builds, created by enthousiasts.
If you want to share your buildings, post a picture on Mobaco Facebook group.